Wednesday, August 7, 2013

Learn How To Use Flash CS5 - Tutorials for Beginners

Hello! Thanks for visiting my page. If you're looking to learn how to use Flash CS5, then check out my Flash CS5 tutorials for beginners. I've organized them into different chapters, which you can see below. These are a mix of text and video tutorials, and I hope that you'll find them engaging and enriching. Have fun learning how to use Flash CS5!

Chapter 1 - Getting Started

  1. Getting Started with Flash CS5
  2. The Properties Panel

Chapter 2 - Drawing in Flash

  1. The fill color vs the stroke color
  2. Understanding the difference between object drawing mode and merge drawing mode

Chapter 3 - The Flash Timeline Window

  1. Working with Layers in Flash
  2. Creating a frame by frame animation in Flash
  3. Understanding when to insert frames, keyframes, and blank keyframes

Chapter 4 - Symbols in Flash

  1. Introduction to Flash symbols

Chapter 5 - Tweens

  1. Working with Classic Tweens
  2. Adding a Layer Mask in Flash
  3. Adding a Classic Motion Guide

Chapter 6 - Nesting

  1. Creating a Nested Animation

Thank you for visiting my Flash CS5 tutorials for beginners page. I hope you were able to learn a lot about how to use Flash CS5. If you know other people who also want to learn, feel free to share this page with them.

Link:

Learn All About The Flash CS5 Classic Tween

Welcome to my Flash CS5 classic tween tutorial page. Here, you'll find a collection of video tutorials that will teach you how to create classic tweens in Flash CS5. Each video explains a specific topic, and shows simple examples that you can easily follow. So now, let's begin learning all about the Flash CS5 classic tween.

PART 1 - Introduction to Classic Tweens

Let's start off with an introduction explaining what Flash CS5 Classic Tweens are. And I'll also show you how to create a very simple example.
[WATCH THE VIDEO TUTORIAL]

PART 2 - Adding More Keyframes

In part 2 of this video series on the Flash CS5 classic tween, we're going to edit the animation that we made in part 1. We'll be adding a few more keyframes to make the circle move in a few more different directions.
[WATCH THE VIDEO TUTORIAL]

PART 3 - Editing the Position of an Object in Each Keyframe

Here in part 3 of this video series on the Flash CS5 classic tween, we're going to edit the animation that we finished in part 2. But instead of adding more keyframes, we're just going to make use of the existing keyframes, and simply change the position of the circle in each of them. That way, we'll still end up with a different animation where the circle is moving in a different direction.
[WATCH THE VIDEO TUTORIAL]

PART 4 - Adding a Keyframe in Between Two Existing Keyframes

In part 4 of this video series on the Flash CS5 classic tween, I'll show you how to quickly add a keyframe in between 2 keyframes that already have a classic tween. I'll also show you how to remove a keyframe.
[WATCH THE VIDEO TUTORIAL]

PART 5 - Adjusting the Distance Between Keyframes

Here in part 5 of this video series about classic tweens in Flash CS5, I'll show you how to adjust the distance between the keyframes of your classic tweens. Adjusting the distance between keyframes will allow you to edit the speed of your tweens.
[WATCH THE VIDEO TUTORIAL]

PART 6 - Tweening 2 or More Objects at the Same Time

In part 6, I'll show you the number one rule to follow when tweening two or more objects at the same time.
[WATCH THE VIDEO TUTORIAL]

PART 7 - Creating a Scaling Animation

In part 7 of this video series on the Flash CS5 classic tween, I'll show you how to create a scaling animation. In this example, we'll learn how to make a circle grow using a classic tween.
[WATCH THE VIDEO TUTORIAL]

Thanks for visiting this page. If you know other people who'd also like to learn all about the Flash CS5 Classic Tween, feel free to share this page with them!

Saturday, September 22, 2012

Making Flash Buttons - An Introduction to Creating Button Symbols in Flash CS5

One of the types of symbols in Flash is the Button symbol. Button symbols are ones that respond to user-based interaction via the mouse. And in conjunction with ActionScript programming, they enable you to add interactivity to your Flash movie.

But we won't be tackling ActionScript in this introductory lesson. Instead, we'll first get know the basics of making buttons in Flash.

Let's begin.

Creating a Button Symbol

Step 1

Create a new Flash Document.

Step 2

Use the Oval tool to draw a circle in the center of the stage. You can choose any color want. I'm going to use blue.

Step 3

Select your circle (if your circle has a fill and a stroke, make sure that both parts are selected), then right-click on it and choose Convert to Symbol. Convert your circle into a button symbol by selecting Button as the symbol type. Name your button MyButton and click OK.


You have now created a button symbol.

Step 4

Choose Control > Test Movie > in Flash Professional to test your movie. Alternatively, you can press ctrl + enter (pc) or command + return (mac) on your keyboard as a shortcut to testing the movie. When your SWF test movie launches, move your mouse pointer over the button you just created. You will notice that your pointer turns into a hand icon.


This happens when your pointer is on a button's active area. A button's active area refers to the part of the button that responds to button presses and mouse overs. Typically, the button's active area is the entire visible area of the button itself. But in Flash, you can actually edit a button so that a different area becomes the active area. We'll talk about that later on.

Right now, nothing else happens when you mouse over or press the button. As I've mentioned earlier, we'll need ActionScript to be able to add interactivity to buttons, and that's something that we're not going to tackle in this tutorial. However, there are some basic things we can do to make this button a little more interesting without the need for ActionScript. In this example, we'll make it so that the button changes color when we mouse over and press it. But before we do that, let's learn about the different states of a button symbol in Flash.

The 4 States of a Button Symbol in Flash

In Flash, a button symbol has what you call states. There are 4 of them. These states refer to the different interactions that a button has with the mouse pointer. These 4 states are:

UP - This is default state of the button symbol. This is how the button looks like when the mouse pointer is not interacting with it.

OVER - This is the state of the button when the mouse pointer is hovering over its active area. When you move the mouse OVER the button, then it goes into the OVER state.

DOWN - This is the state of the button when the pointer is over the active area AND you are pressing DOWN the mouse button. Take note that pressing is different from clicking. When you click, this denotes that you press AND THEN release. When you release the mouse button, then your button is no longer in the DOWN state.

HIT - This defines the area of your button that is active. The active area refers to the part of the button that responds when ever you press or mouse over it. We'll talk more about this later.

You can modify these button states by going inside the button's timeline and editing the button. Let's go ahead and do that.

Editing a Button Symbol

Step 1

Close your SWF test movie window and go back to the stage of your Flash document.

Step 2

Go inside the button symbol's timeline by double-clicking on it. In the edit bar, you should see the name of your symbol right next to the Scene 1 link.


This means that you are no longer in the main timeline, but are now inside the button symbol's timeline instead. So you can now edit the symbol.

You will notice that your button symbol has a different kind of timeline. Instead of having numbered frames, you'll see that you only have 4 frames. These are the frames for the 4 button states, and you'll see that they are labeled accordingly - UP, OVER, DOWN and HIT.


To get a better idea of how these button states work, let's edit the button. Well make it so that the button changes color depending on the state that it's in.

Step 3

Select the Over frame and insert a keyframe by right-clicking on it and choosing Insert Keyframe. Alternatively, you can press F6 on your keyboard to add a keyframe.


Add a keyframe on the Down and Hit frames as well.


We want to insert keyframes on all of the button states so that we can make independent changes to the properties of the circle shape in each of the different states.

Step 4

Move the playhead back to the Over keyframe and then select the circle on the stage.


Then change the shape's fill color to a different one. To change the fill color, select a new color from the Fill color box found in the toolbar.


You can choose whatever color you want. I'm going to choose red.


Step 5

After you've changed the circle's fill color in the Over state, go ahead and change the color of the circle in the Down state as well. To do this, move the playhead to the Down keyframe of the button symbol's timeline.

 
Now select the circle on the stage, and change this one's fill color to a different one also. You can choose whatever color you want. I'm going to choose yellow.


So now, the circle has a different color for the Up, Over, and Down states. There's still the Hit keyframe, but we'll talk about that later.

Step 6

For now, let's test the movie by pressing ctrl + enter (pc) or command + return (mac).

Step 7

When the test movie comes out, make sure that your mouse pointer does not touch the button. This would be the button's UP state. It is the default appearance of the button when the mouse does not interact with it.


Step 8

Next, move the mouse pointer on top of the button. This would be the buttons OVER state. Once your pointer hovers over the button, you should see it change color to whatever color you picked for the OVER state.


Step 9

Next, make sure your mouse cursor is still over the button, and then press it. This would now be the DOWN state, and you should see the circle change to the color that you picked in the DOWN keyframe.


So now we've seen an example of the first 3 button states in action. To make more changes to the appearance of the button, you can go back to editing it in the UP, OVER, and DOWN keyframes. You're not just limited to changing the color. You can change the size and shape so that it's different on each state, and you can even add some text.

And now, let's move on to the Hit state.

The Hit State

The Hit state defines the button symbol's active area. When the mouse pointer "hits" that area, then the button will respond.

The Hit keyframe is where you will draw the area that will determine which parts or portions of the button will respond to mouse interaction. You can design it so that the button's responsive area is different from the button that you can actually see. This "hit" area can be bigger or smaller than the actual button. It can be a different shape. It can even be in a spot that's away from the actual button.

Let's see how that works.

Step 1

Close your SWF test movie window and go back to your FLA document. You will now edit the button's Hit state.

Step 2

Select the Hit keyframe.


And then observe the circle on your stage.


When you're dealing with the Hit state, the color of the shape on your stage does not matter, because the hit area can't actually be seen. What matters is the size and shape. The size and shape determine which areas will make the button responsive.

Right now, the circle in the Hit keyframe is exactly the same size and shape as the circles in the other keyframes.


So what we will do then is change the circle's size in the Hit keyframe. And then let's see what happens when we do that.

Step 3

Make sure you are still on the Hit keyframe and select the entire circle on your stage. If it has a fill and a stroke, then make sure you select both of those.

Step 4

Then choose the Free Transform tool from your Tools panel and resize the circle. Make it about 50% bigger than the original size.


So now, the circle on the Hit keyframe is bigger than the circle in the other keyframes. Go to the Up, Over and Down keyframes to get another look at the circles on those keyframes. Then go back to the Hit keyframe and take note of the bigger circle again. Keep in mind the area that this bigger circle occupies. I'll ask you to try and recall that later on.


Step 5

Now test your movie.

When it comes out, make sure that your pointer is far away from the button. Move it outside of the test movie window if you can. We don't want any mouse interactions just yet.

When you see the button, you won't see the bigger circle that you drew in the Hit area. That's OK. That's really how it's supposed to be. As I've mentioned earlier, the hit area can't be seen. So right now, it doesn't appear as if anything has changed.


Step 6

Now try to recall the area that the larger circle in your Hit keyframe occupies. That would be your button's hit area. In the one that I made, it should be somewhere around here (denoted by the circle with the red dashed outline):


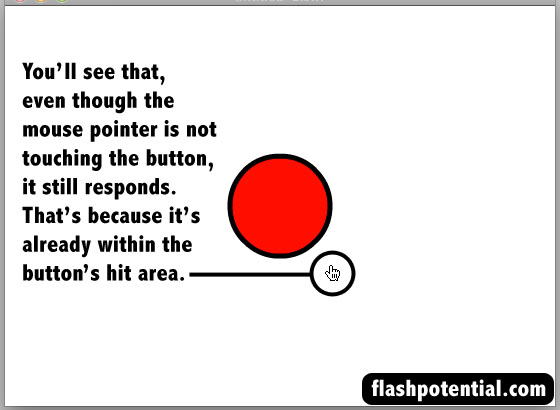
And again, we won't be able to actually see it. But watch what happens if you place your mouse pointer within the hit area, but without touching the actual button.


You'll see that your mouse pointer turns into the hand icon, and the color of the button changes to the color of the over state. Which means that your button is actually responding to a mouse over. You're not over the actual visible area of the button, but you are over the button's hit area as defined in the Hit keyframe. This is the reason why the button is responding.


So that is what the Hit state is. The Up, Over, and Down states refer to the appearance of the button, but the Hit state refers to the actual area of the button that you can interact with using your mouse. This area can be the exact same size  and shape as the actual visible button, but it doesn't have to be. As I've said, it can be bigger or smaller, it can be an entirely different shape, and it can even be in a different location. If you place the shape in the hit keyframe in an entirely different spot away from the position of whatever shape or object is in the other keyframes, then it will be like having a hidden button. When you try to click on the button that you can see, then nothing will happen. But when you find the hidden hit area, then the button responds. So it can be pretty interesting to play around with this feature of Button symbols. Try going back to your Flash document, and edit your button some more to see what you can come up with.

And that concludes this introductory lesson on making Button symbols in Flash.

Friday, May 11, 2012

The New Features of Adobe Flash Professional CS6

The Adobe Creative Suite 6 was released last May 07, 2012, and with it comes Adobe Flash Professional CS6. Here are some of it's new features:

  • the ability to create and export sprite sheets from symbols on the Stage and in the library
  • a new SWF compression type based on LZMA (Lempel-Ziv-Markov chain algorithm), which can reduce the file size by up to 40%
  • ability to export animations from Flash out to HTML5 through the Toolkit for CreateJS extension
  • captive AIR runtime support for Android, OS X, and Windows
  • the new Content Simulator, an AIR application that helps you simulate how your content will behave on a mobile device
  • Flash Professional CS6 projects are now compatible with AIR native extensions for advanced users with the advent of AIR 3.2
  • the ability to list additional languages that your application can be installed in
  • iOS debugging via wi-fi now lets you add breakpoints, step in and out of functions, and watch variables

If you're a beginner who's just purchased the Adobe Flash Professional CS6 program, check out the Adobe Flash Professional CS6 Essential Training course so that you can get the most out of this amazing program. You can get a free 7-day trial for complete access to this entire 8-hour online video training course by lynda.com.

Monday, November 14, 2011

Creating Basic Tween Examples in Flash CS5

Create a new Flash document. Follow the steps below to add different kinds of tweens to your Flash movie.

By the end of this tutorial, you should have something like this: [DEMO PAGE]

Movement - Classic Tween
  1. Draw a circle on the upper-left corner of the stage using the oval tool. 
  2. Select the whole shape using the selection tool, and then convert it into a graphic symbol named Circle.
  3. On the timeline, right-click on the frame 40 box and choose Insert Keyframe.
  4. Make sure you are still on frame 40 by clicking on the keyframe that you just added. 
  5. Then use the selection tool to move the circle to the upper-right corner of the stage.
  6. On the timeline, right-click anywhere between frames 1 and 40 and choose Create Classic Tween.
  7. Press ctrl + enter (PC) or cmd + return (Mac) to test your movie.
  8. Save your work.

Scaling Animation - Classic Tween
  1. Insert a new layer.
  2. Make sure you are on frame 1 of this second layer by clicking on the blank keyframe on frame 1.
  3. Use the rectangle tool to draw a square shape in the middle of the stage.
  4. Select the whole shape using the selection tool, and convert it into a graphic symbol named Square.
  5. On the timeline (layer 2), select frame 40 by clicking on it. Make sure that no other frames are highlighted except for frame 40 of layer 2.
  6. Once it's selected, right-click on it and choose Insert Keyframe.
  7. Make sure sure you are still on frame 40 of the second layer by clicking on the keyframe that you just added.
  8. Then on the stage, right-click on the square and choose Free Transform. 
  9. Make the square bigger by clicking on any of the corner handles and dragging outward.
  10. On the timeline (layer 2), right-click anywhere between frames 1 and 40 and choose Create Classic Tween.
  11. Press ctrl + enter (PC) or cmd + return (Mac) to test your movie.
  12. Save your work.

Color Changing Effect - Classic Tween
  1. Insert a new layer (this will be the 3rd layer).
  2. Make sure you are on frame 1 of this third layer by clicking on the blank keyframe on frame 1.
  3. From the library, add another instance of the Circle symbol and place it on the lower-left corner of the stage.
  4. On the timeline (layer 3), select frame 40 by clicking on it. Make sure that no other frames are highlighted except for frame 40 of layer 3.
  5. Once it's selected, right-click on it and choose Insert Keyframe.
  6. Make sure sure you are still on frame 40 of this third layer by clicking on the keyframe that you just added.
  7. Then select this new instance of the circle symbol on the stage by clicking on it using the selection tool. Do this even if the instance already looks selected just to make sure that it's really selected. Make you sure you only click on it <b>ONCE</b>. Do <b>NOT</b> double-click on it. If you double-click on it, you will enter the symbol's timeline.
  8. After selecting the instance, go to the Properties Inspector. If you don’t see the Properties Inspector, choose Window > Properties.
  9. You should see the properties of the selected graphic instance in the Properties Inspector. Under Color Effect, click on the Style drop-down menu and choose Tint.
  10. Click on the tint color box and choose a new color for the instance. Make sure that the tint amount slider below the drop-down menu is at 100%.
  11. On the timeline (layer 3), right-click anywhere between frames 1 and 40 and choose Create Classic Tween.
  12. Press ctrl + enter (PC) or cmd + return (Mac) to test your movie.
  13. Save your work.

Morphing Effect - Shape Tween
  1. Insert a new layer (this will be the 4th layer).
  2. Make sure you are on frame 1 of this fourth layer by clicking on the blank keyframe on frame 1.
  3. Draw a circle on the lower-right corner of your Stage. DO NOT CONVERT IT INTO A SYMBOL. We are going to add a shape tween, and it will not work if you convert the shape into a symbol.
  4. On the timeline (layer 4), select frame 40 by clicking on it. Make sure that no other frames are highlighted except for frame 40 of layer 4. 
  5. Once frame 40 of layer 4 is selected, right-click on the frame and choose Insert BLANK Keyframe. You should see the circle disappear.
  6. Make sure sure you are still on frame 40 of this fourth layer by clicking on the BLANK keyframe that you just added.
  7. Then switch to the rectangle tool and draw a square shape on the same spot that the circle was on.
  8. On the timeline (layer 4), right-click anywhere between frames 1 and 40 and choose Create Shape Tween.
  9. Press ctrl + enter (PC) or cmd + return (Mac) to test your movie.
  10. Save your work.

PART 4 - Creating and editing a symbol - Introduction to Flash Symbols

You can create a symbol out of any artwork that you draw or import onto the stage. In this tutorial, we'll draw a simple circle shape, convert it into a symbol, and then edit that symbol.

Step 1

Create a new Flash document.

Step 2

Select the oval tool and draw a circle on the stage. It can be in the merge drawing mode or object drawing mode. But I'll be drawing in the merge mode.

Step 3

Switch to the selection tool and use it to select the circle on the stage. Make sure that you select the ENTIRE shape.


Step 4

Once it's selected, right-click on the shape and choose Convert to Symbol.


This will bring up the Convert to Symbol dialog box.

Step 5

In the Convert to Symbol dialog box, change the name of the symbol to Circle. For the symbol type, click on the drop-down menu and choose Graphic. For the registration point, you can click on any of the nine tiny squares to select a point. We won't be discussing what the registration point is for in this tutorial, but for now, choose the center registration point by clicking on the tiny square that's in the center of all the tiny squares. The chosen registration point will turn black.


Then click OK.

The shape on the stage should now be converted into a symbol.

Step 6

Open up the library to check that your new symbol is there. If you can't find the library, you can go to Window > Library or you can press ctrl + L (PC) or cmd + L (Mac) on your keyboard.


Step 7

Add a few more instances of the symbol by clicking and dragging the symbol from the library down to the stage. In the image below, I've added a total of five instances to the stage.


Step 8

Let's make some changes to the symbol by editing it. In the library, right-click on the symbol and choose Edit.

Step 9

After clicking on Edit, take a look at the edit bar to make sure that you are inside the Circle symbol. The edit bar should say Scene 1 > Circle.


Step 10

In the timeline, let's add another layer by clicking on the new layer button. So we should now have two layers.


Remember! We are inside the Circle symbol so this means that the layer was added to the symbol's timeline and not the main timeline.

Step 11

Select the brush tool and choose a color that's different from the color of the circle. Then make sure that the new layer that you just added is the active layer, and then draw a smiley face on top of the circle.


Step 12

Go back to the main timeline by clicking on the Scene 1 link. You should see that all of the instances on the stage now have smiley faces.


Congratulations! You've just created and edited your own symbol.

Try this on your own

  • Draw two circles on the stage.
  • Convert each circle into a graphic symbol.
  • Go inside each symbol's timeline and draw a face on the circle.
  • Use multiple layers to separate the parts (eyes, nose, lips, etc...) of each face.

And that concludes this tutorial series on an Introduction to Flash symbols.

<< PREV: The 3 types of symbols - Introduction to Flash Symbols PART 3

PART 3 - The 3 types of symbols - Introduction to Flash Symbols

The three types of symbols in Flash are:

Graphic
Use graphic symbols for static artwork and animation that you do not plan on adding any interactive functionality to. The reason for this is that you'll need ActionScript to add interactivity, and graphic symbols are not designed to work with ActionScript.

Button
Use button symbols if you want to add mouse-related interactivity such as clicks and roll overs to your Flash movie. For example, you could create a button that plays a song whenever it is clicked.

Movie Clip
The movie clip symbol is like a combination of graphics, buttons and more. It can be used for static artwork and animation, but it can also be used with ActionScript so that interactive functionality can be added to it. But unlike buttons, movie clips are capable of much more than mouse-related interactivity.


There's a lot more to learn about each type of symbol, but I will be covering them in later tutorials. For now, let's move on to the next part of this series where we will learn how to create a symbol from scratch.

<< PREV: Going inside a symbol's timeline - Introduction to Flash Symbols PART 2